What Size Can I Print with the Panasonic LX100
It's pretty common to come across discussions about print size around the Internet. There are also quite a lot of misconceptions about the relationship between sensor resolution and final output. It isn’t simply a question of ‘doing it by the numbers’.
The conventional calculation, based on 300 PPI (pixels per inch) tells us that the native print size of the uncropped (4112x3088 pixels) LX100 files will yield a print of about 13.7x10.3 inches.
If any of you have been working professional photographers (or keen printers) you’ll know how flexible the print size equation really is. It wasn't so long ago when we were using 10 megapixel DSLR cameras, and our clients still expected us to create beautiful enlargements. The most popular size which my clients tend to order (this hasn’t changed over the years) is 30 inches, followed by 40 inches. I can look around my viewing room at large photographs created from previous cameras which I remember well – my Canon 40D and my Canon 5D, coming in at 10 and 13 megapixels respectively. So how come we could make such good quality blow-ups?
Getting a High Quality Large Print
Well, final print size isn't only about megapixels. There are a number of factors which influence how large you can print any given photograph, such as:
Camera craft - your ability to get your exposure right and your focus point precise
the amount of noise in the photograph (a factor of ISO or lifting exposure during postproduction)
the correct shutter speed to avoid blur from handholding or subject movement
lens resolution/sharpness, chromatic aberration
careful processing
viewing distance
substrate – gloss prints show up every imperfection, canvas is much more forgiving
Viewing distance is significant if we're producing photographs for things like billboards. These can be 20 or 30 feet across but they’re normally viewed from at least 30 feet away. For that reason a 20 megapixel camera can be quite adequate, assuming good optics. Billboards are often created from photographs enlarged at as little as 30 ppi, or even less in some cases.
I know from experience that I can make a lovely 30 inch print from a photograph produced from a camera with relatively modest resolution. And the greatest aid to that (apart from my ability to control focus) is the sharpness/resolving power of my lenses. This can make or break print size.
Printing Isn’t Just About the Megapixels
I've owned a couple of 1 inch sensor compact cameras in the past, the Sony RX100ii and the Canon G5X. As I recall they have a sensor resolution of about 20 megapixels. That's pretty impressive, and in general terms it will lead you to believe that you can make really big prints – enlarging in excess of the 30 inches I've just mentioned. Well, it isn't that simple. For a start, the lenses on these cameras (and this also applies to many kit lenses which accompany cameras with large sensors) tend to be quite soft round the edges, particularly the corners. So much so, that if you want to print over about 8 inches across you’ll need to do some cropping to get rid of the softness. The amount of cropping increases as your print size increases. The bigger you print, the more obvious imperfections become. Straightaway you've knocked down your native resolution from 20 megapixels to about 14. Then we have to consider the centre sharpness of the lens, and how well that resolves detail. The lens on your compact camera isn't going to come close to a well specified prime lens (or even a good professional or semi-pro zoom lens). For these reasons the prints I made from my 1 inch compact cameras tended to be smaller than the enlargements I used to make from my 10 to 13MP DSLRs.
So how does the LX100 stack up against all of this? As you might remember, this camera uses a micro 4/3 sensor but the image circle of the lens results in a file of about 12.7MP. Pretty close to the DSLR cameras I was using professionally a few years ago. The Leica zoom lens on the LX100 is impressive, better than the vast majority of kit lenses which might accompany a DSLR or system camera. It's sharp wide open and the edge sharpness is quite acceptable. The autofocus system is also extremely accurate (though slightly less so with distance, in which case switching to pinpoint autofocus might be preferable).
Overall the pictures from my LX100 are a little sharper than my previous personal use cameras such as the Olympus EM10 or Panasonic GM1 (when teamed with a walkabout kit zoom). So immediately the gap between the 12.7MP LX100 and my 16MP Micro 4/3 system cameras has narrowed a little – purely because of lens differences. Putting a really sharp prime on a u43 interchangeable lens camera will widen the gap of course, but don't forget we're talking about a small compact zoomable portable setup. That isn't going to involve large or heavy professional grade lenses (like the Olympus 12-40 f2.8).
How to Test a Print Enlargement
A really good way of testing how an enlargement will look before committing to an expensive print is to do a simple test at your desk. Enlarge your photograph - you can do this inside Photoshop or by using special enlargement software such as Genuine Fractals, or Blow Up. Use whatever PPI setting you would normally choose (300ppi is standard for top quality printing). Then sharpen the photograph appropriately and take a 10 x 8 crop from a detailed or important part of the image. Print this out (preferably using the kind of photographic paper the final print would be on). Stick this to the wall and then look at it from the kind of viewing distance at which you would be observing the final enlargement. I bet it looks much better than you expected - way better than it looked on screen zooming in, right?
Compromises when Making Print Enlargements
As a point of comparison, I can make extremely large prints if I'm shooting with my APS-C 24MP Sony a6300, at base ISO 100, and the Sigma 30mm f1.4 Contemporary lens. The results from that combination are extraordinary in their clarity and detail. I would have no hesitation in printing those photographs at 60 inches across. But that particular Sony configuration doesn't meet my pocketability, zoomability and light weight criteria. In order for the Sony camera to be viable as a handbag accessory I would need to fit the 16-50 f3.5 to f5.6 pancake kit zoom. And because of that, our maximum print size suddenly starts to fall. It's a good little lens, but it has soft edges and it's quite soft at the long extremity. As the light falls this combination is disadvantaged because the lens is two stops slower than the LX100 with its f1.7 to f2.8 lens. Although the sensor of the a6300 is larger, giving a noise advantage of over a stop and depth of field advantage of about one stop, you can immediately see where the LX100 will pull ahead. In poor light the LX100 will give you a bit of an advantage on ISO values and you’ll also have about a stop shallower depth of field - handy if you enjoy portraits. So due to the noise offset and the LX100’s superior lens, your prints from each camera in low light conditions will end up fairly close in size, even though the a6300 has more sensor real estate.
My Panasonic GX8 has a 20MP u43 sensor, with base ISO of 200. Shooting with that, using the Olympus 12 to 40 F2 .8 lens, would generally mean that I'm quite happy printing to 40 inches in good conditions. But as with most cameras, a step up in ISO brings your print size down a notch.
So, let's do a trial along the lines of the test I mentioned a couple of paragraphs back. I photographed the same scene with my Panasonic GX8 (20MP u43, with the Olympus 12-40 f2.8 Pro), Sony a6300 (24MP APS-C with the 18-105 f4), and the LX100. Here’s the full size scene with no cropping:
Scene Overview
I've chosen good quality standard zoom lenses for the GX8 and a6300 as I would normally choose for an everyday outing. I shot in Aperture priority at f4 on the Micro 4/3 bodies and f5.6 on the Sony to allow for the sensor size differential. I couldn't do this test outside as I had intended, due to the weather, so my dining room had to suffice. I was at ISO 400 on all machines and the slow shutter speeds required that I stabilised the cameras in order to get totally sharp photographs. Oh - and I standardised each camera’s aspect ratio to avoid any cropping afterwards.
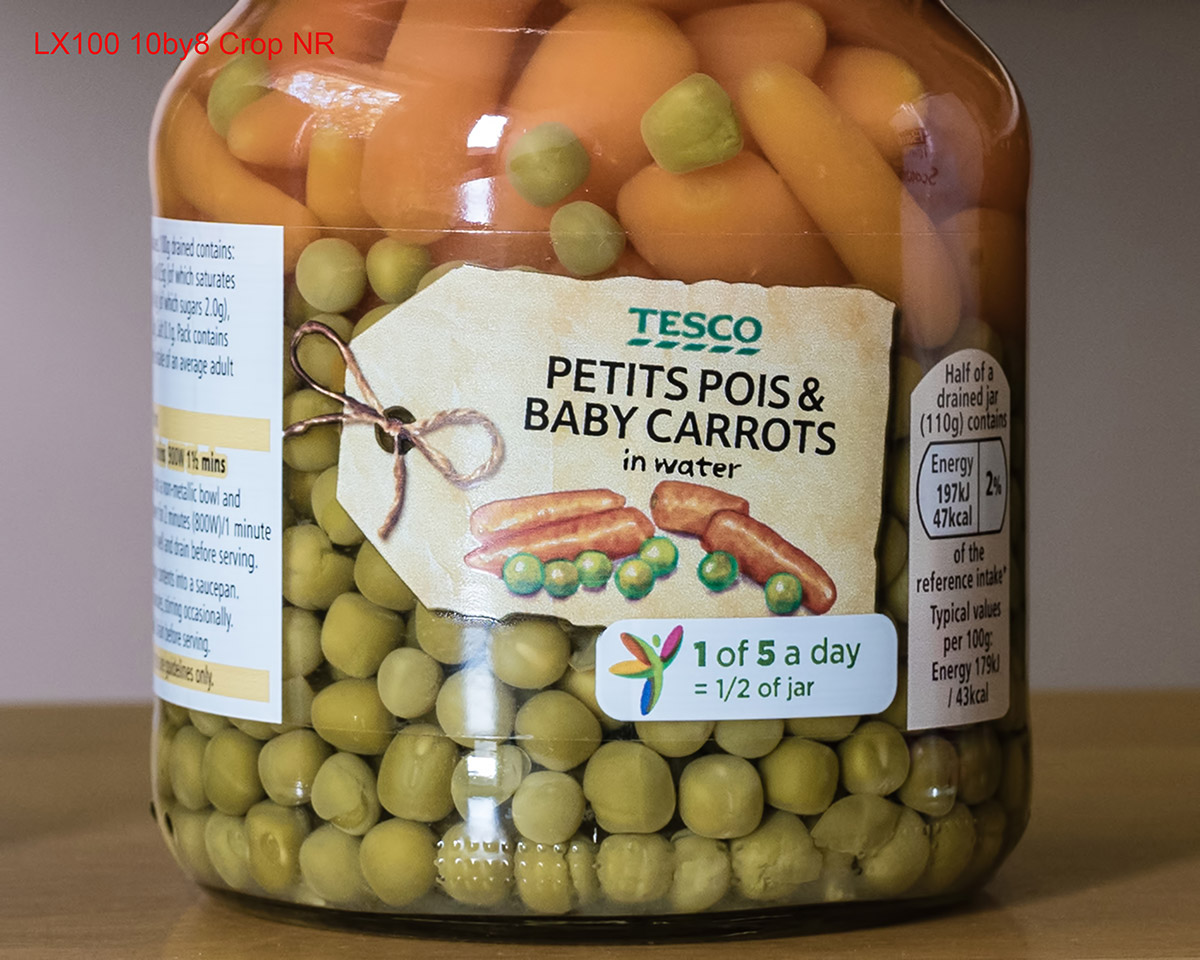
I then took the RAW files into Lightroom and applied a subtle curve boost as I normally do, minimal capture sharpening, and 11 for luminance noise. I then exported the images as high-quality JPEGs with no export sharpening, into Photoshop CS6. I then enlarged them to 30by20, still at 300ppi. Next, I cropped a 10 x 8" section from the same part of each photograph. We can now compare these sections, preferably by printing them. Here are the crops from each camera:
In print, it was quite difficult to see any differences. Zooming in on the computer, pixel peeping beyond the size of the print, will of course reveal a difference between the LX100 shot and those of the higher resolution cameras. But not by much. In fact the lens on the LX100 is so sharp at near to intermediate distances that the level of detail recorded was very similar. There was a little more noise, as you would expect when blowing up a 12.7 u43 file so much. However the sharpness of the LX100 lens is such that we can apply a bit of subtle noise reduction and still keep near enough the same clarity that we achieved from the other cameras:
Conclusions
My conclusion is that at ISO 400, printing at 30x20, reveals surprisingly little difference between the three cameras. If we increase the print size in this particular scenario then we will start to see differences between the lower resolution camera and the larger megapixel competitors. But this is a really good result.
As you can see, making large prints is a juggling act. Because of the various considerations there is no hard and fast answer to how large we can go. It all depends on the quality of the capture, your lens, your viewing distance, and your substrate. Do some tests of your own and you might be (pleasantly) surprised.


